
Korean Braised Beef (Slow-Cooked Crowd Favorite)


Founder / Chef / Everyone’s Best Friend
Andy Hay
Welcome to my kitchen. I hope to inspire you to grow as a home cook!
This is one of those recipes I come back to again and again when I’m feeding a crowd or setting myself up for the week. This Korean braised beef chuck roast recipe is rich, savory, slightly sweet, deeply flavorful, and completely hands-off once it hits the oven. It’s the kind of dish that smells incredible, shreds effortlessly, and somehow works in just about anything you serve it with.
What I love most about this braised beef recipe is how flexible it is. You can pile it into a rice bowl, tuck it into lettuce cups, roll it into burritos, or eat it straight from the pot with a spoon (no judgment). It’s a slow-cooked, Korean-style pot roast that feels comforting and bold at the same time — and it’s ideal for meal prep.
This is also one of those dishes that makes people think you worked way harder than you actually did. The prep is minimal. The oven does the heavy lifting. And four hours later, you’ve got deeply tender beef that shreds with forks and soaks up every bit of that sauce.


Ingredients:
- 3-4 lb chuck or blade roast
- 1 grated apple
- 1/3 cup gojuchang (if you're sensitive to spice, start off with less)
- 1 medium onion diced
- 4 cloves garlic, minced
- 1 inch ginger minced
- 2 tbsp honey
- 2 tbsp apple cider vinegar
- 2 cups beef broth
- 1/2 cup low sodium soy sauce
- 1/2 cup chopped kimchi (optional but awesome)
Instructions:
- Preheat the oven to 325°F (165°C).
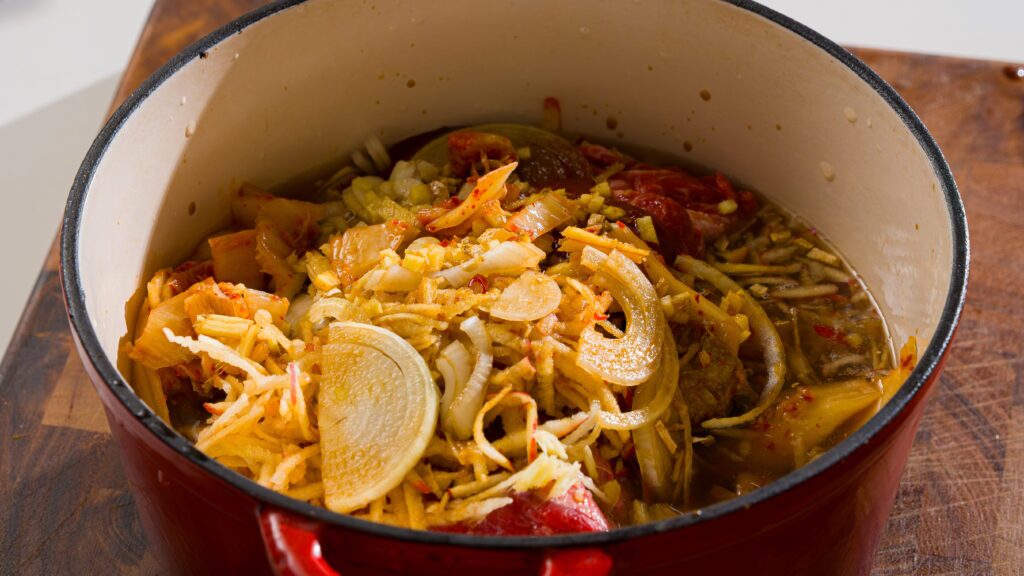
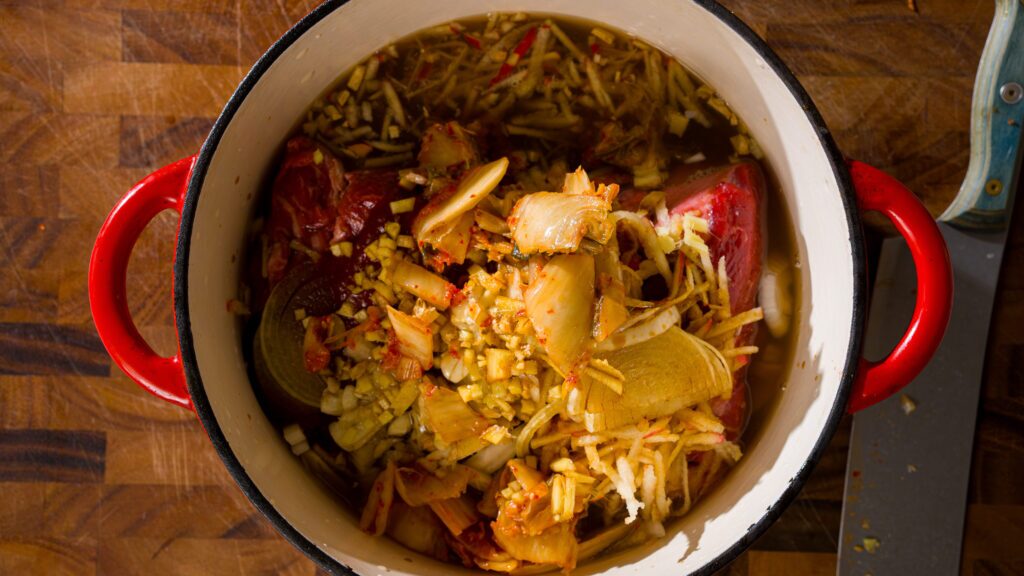
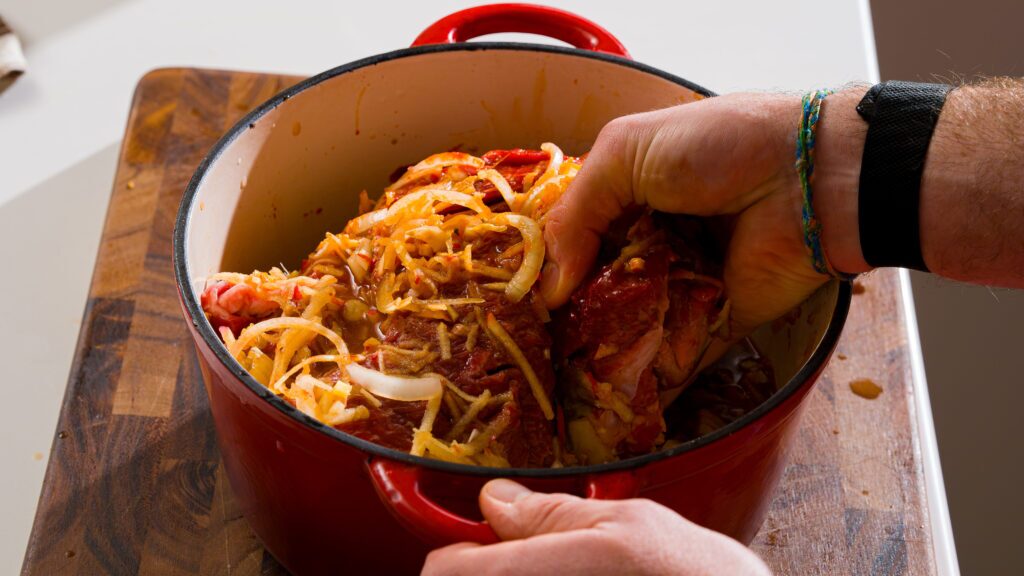
- Place the chuck or blade roast into a large Dutch oven or heavy oven-safe pot.
- Add the grated apple, gochujang, diced onion, minced garlic, minced ginger, honey, apple cider vinegar, beef broth, soy sauce, and chopped kimchi (if using) directly into the pot with the beef.
- Using a spoon or your hands, turn the beef in the sauce until it is well coated on all sides.
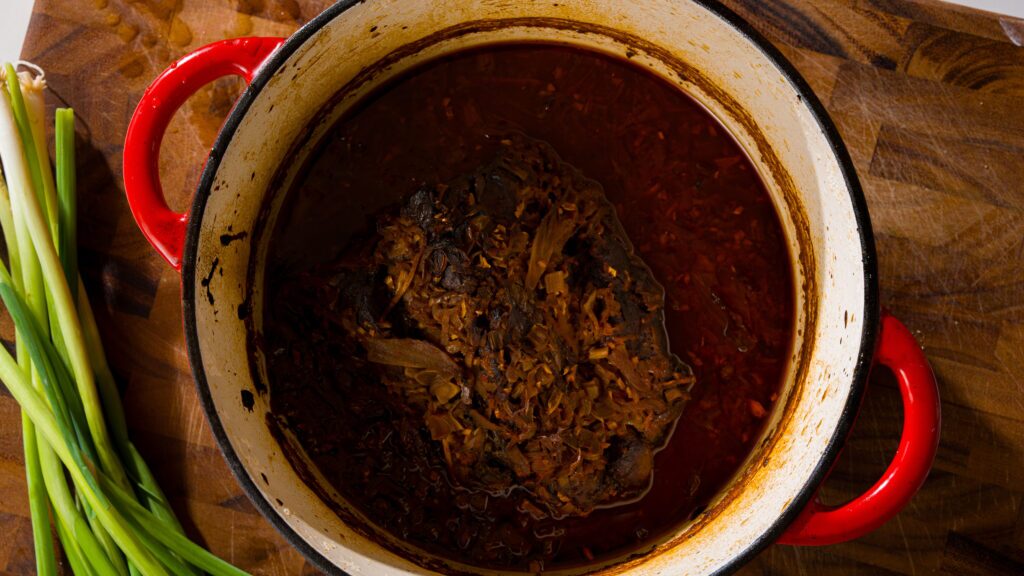
- Cover the Dutch oven with a tight-fitting lid and place it in the oven. Cook for 4 hours, undisturbed, until the beef is very tender.
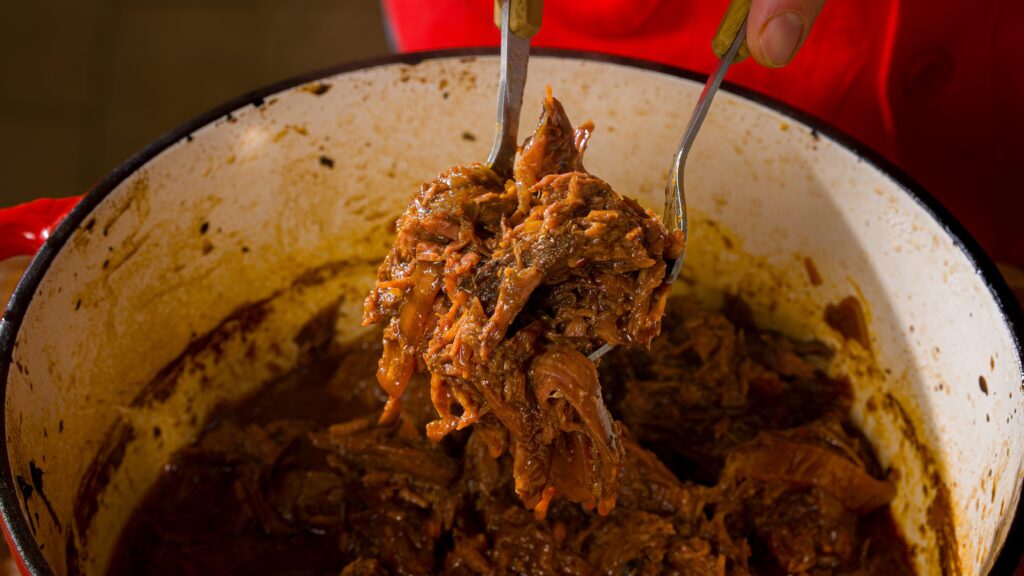
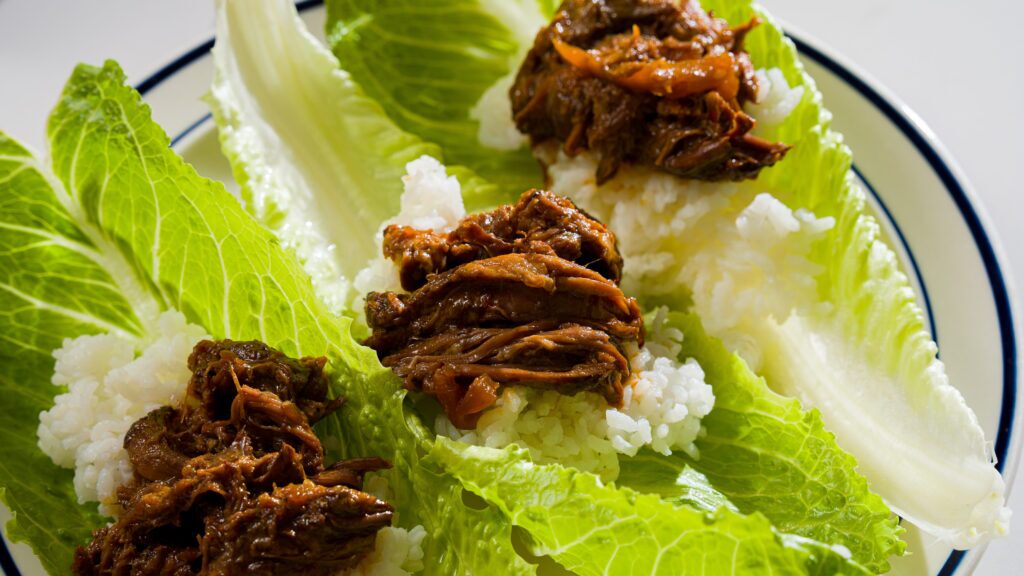
- Remove the pot from the oven. Using two forks, shred the beef directly in the pot, mixing it back into the cooking liquid so it stays moist and flavorful.
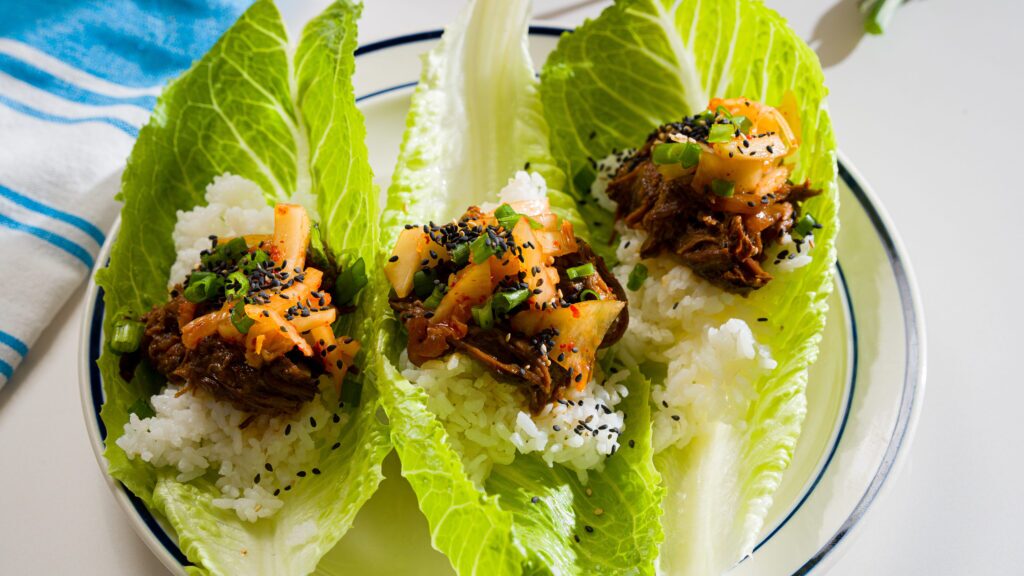
- Serve the shredded Korean braised beef in rice bowls, lettuce cups, or burritos.
- Don’t forget to rate this recipe and leave a comment!
Why Chuck Roast Is Perfect for Braising
When it comes to braised beef, this cut of beef is unbeatable. Chuck or blade roast comes from the shoulder, which means it’s loaded with connective tissue and fat — exactly what you want for long, slow cooking. As it braises, that collagen melts down into the liquid, creating richness and body without needing any extra thickeners. And trust me, it gets fall apart tender, every time.
This is why chuck roast is so often used in pot roast, stew, and even short ribs–style dishes. It’s forgiving, flavorful, and built for time. As long as you keep it covered in liquid and give it enough cooking time, it will reward you with tender, pull-apart beef every single time.
You don’t need bones, fancy cuts, or a trip to a specialty butcher for this. A solid chuck roast from your grocery store does the job beautifully.
The Flavor Profile: Deep, Savory, Balanced
What sets this Korean braised beef apart is the balance of flavors. Gochujang brings heat, umami, and depth. Soy sauce adds salt and savoriness.
Honey and grated apple soften everything with natural sweetness. Garlic and ginger add warmth and aroma. Beef broth ties it all together into a rich braising liquid that slowly reduces and concentrates as it cooks.
This isn’t meant to be aggressively spicy. It’s bold, but balanced. The sweetness keeps the heat in check, and the acidity from apple cider vinegar lifts the whole dish so it never feels heavy.
Adding chopped kimchi at the start is optional, but if you’re a fan of Korean food, it’s worth it. It melts into the sauce, adding funk, acidity, and extra complexity without overpowering the beef.
Korean Braised Beef: A True Set-It-and-Forget-It Dish
This is the definition of a low-effort, high-reward meal. Everything goes into a large Dutch oven, the lid goes on, and the oven does the rest. There’s no need to stir constantly, no pan juggling, no monitoring over medium-high heat. Just time and patience.
After about four hours at a steady temperature, the beef becomes tender enough to shred easily with two forks. If it doesn’t shred cleanly, it simply needs more time. Braised beef can’t be rushed.
Once shredded, the beef gets tossed back through the liquid so every strand is coated in sauce. That’s where the magic happens.
Tips & Tricks for Perfect Korean Braised Beef Chuck Roast
Use a heavy pot
A Dutch oven or other heavy pot with a tight-fitting lid keeps heat even and prevents moisture loss.
Don’t skimp on time
Four hours is ideal. This isn’t a quick cook — the long cooking time is what builds flavor and texture.
Shred in the pot
Shredding the beef directly in the braising liquid keeps it juicy and flavorful.
Let it rest
Like most braised dishes, this tastes even better after it sits for a bit — or the next day from the fridge.
Adjust heat at the end
If you want more kick, add a spoon of gochujang at the end. If you want it milder, serve with rice or vegetables to balance it out.
How to Serve This Korean Braised Beef
This is where the fun really starts. This braised beef works across so many meals:
- Over rice in a bowl
- In lettuce wraps
- Rolled into burritos
- Stuffed into tacos
- Served alongside roasted vegetables
- Tucked into sandwiches
Add a fried egg on top for a killer rice bowl, or spoon some extra liquid over everything like a gravy. However you serve it, it holds up beautifully.
Meal Prep & Storage For This Korean Braised Beef
This is a dream for meal prep. Store the shredded beef and liquid together in an airtight container in the fridge. It keeps well for several days and reheats without drying out.
It also freezes beautifully. Portion it out, freeze, and you’ve got a ready-made protein for future meals. Just thaw gently and reheat.
Why This Korean Braised Beef Belongs in Your Rotation
This Korean braised beef recipe hits every box I care about: minimal prep, bold flavor, flexibility, and crowd appeal. It’s comforting without being boring, rich without being heavy, and endlessly adaptable.
If you’re looking for a reliable braised beef chuck roast that you can use in a dozen different ways, this is it. Save it. Make it. And don’t be surprised if it becomes one of those recipes you’re known for.
Other Recipes You Will Love!
Chuck Roast Recipe (Set-It-and-Forget-It Dinner)
Beef Bulgogi You’ll Want to Make Every Week
Braised Beef Short Ribs with Guinness Sauce
Andy Hay
Andy is the founder of ECK, Chef, and let’s admit it… the reason you’re here. He taught himself to cook, and it all paid off when he secured his spot in the season 5 Finale of Master Chef Canada. Now, Andy uses his big energy to showcase recipes that actually make people want to cook. His brand was built on butter and East Coast charm, and Andy’s kept that same energy ever since. Off-camera, you’ll find him doing what started it all: cooking for his two daughters, wife and the people he loves.
Similar recipes


Rate & leave a comment
28 Comments
— End of comments —
— No more comments to load —
The method was good and recipe seemed so promising but this was really very spicy, to the point my kids couldn’t eat it. I am not sure if the recipe requires clarification or maybe just a caveat to be mindful of the heat – I used gochujang paste, but don’t really know what spice level it is. I believe there is also gochujang sauce that would be milder. I might try it again if I could be sure I was using a milder gochujang.
Sorry to hear that, Deana! You can definitely start off with less of the gochujang next time if you’re sensitive to spice.
Love this recipe! Sooo easy to prep and the end result tastes amazing! Made it twice already, and we definitely be part of my goto recipes for a while!
Easy prep and great taste is a winning combo in y book, Erika! Thanks so much for sharing and taking the time to leave a review.
Turned out amazing! Everyone in the family was quiet as they enjoyed the meal! I reduced spice and added extra onions, garlic and apple. Keeping this one for the meal rotation!
Andy, do you have the nutritional information per Serving (and size of serving)?
Hi Eri! We don’t offer nutritional info at the moment but you can use a free online calculator for a decent estimate. Glad everyone loved this one so much.
Perfect for meal prep!
Agree with you on this one, Sabrina! Thanks so much for the great review!
Oh, this looks delicious! Will have to try it with chicken thighs or maybe a turkey tenderloin as I don’t eat beef or pork anymore. Trying to give up the chicken & turkey but haven’t made the transition to pescatarian yet. Working on it. Will let you know how it turns out! Thanks for sharing the recipe!
Hi Rhonda! I think this would be delicious with chicken or turkey…you will have two adjust the cooking time but the flavour should still be fantastic. Please let me know how it turns out.