
No Knead Cinnamon Raisin Bread (Bakery Smell Guaranteed)



Founder / Chef / Everyone’s Best Friend
Andy Hay
Welcome to my kitchen. I hope to inspire you to grow as a home cook!
There are very few things in life that beat the smell of fresh cinnamon raisin bread coming out of your oven. I’m not exaggerating when I say this no knead cinnamon raisin bread recipe will make your entire house smell like a cozy little corner bakery. And the best part? You didn’t have to spend hours kneading dough or mastering complicated techniques to get there.
This is the kind of no knead bread recipe that turns total beginners into confident bread bakers. If you’ve ever thought, “I can’t make bread,” I promise — you can. This cinnamon raisin bread recipe is forgiving, simple, and wildly satisfying.



Ingredients:
- 3 cups all purpose flour
- 1/2 tsp dry active yeast double check expiry
- 1 tsp salt
- 1 tbs cinnamon
- 1 cup raisins
- 1 1/2 cups warm water (95F-105F)
- 1/3 cup brown sugar
- 2 tbs maple syrup
Instructions:
- In a large bowl mix together the flour, yeast, salt, cinnamon, and raisins. Pour in warm water and throughly mix using your hands or a wooden spoon. Dough should sticky.
- Cover bowl with plastic wrap and let the dough rest for 3-5 hours. You want the mixture to double in size and start to have small bubbles on the top. You can let this sit on the counter for up to 18 hours.
- Once you are ready to start baking, place a dutch oven in an oven preheated to 450F. Let the dutch oven pre heat for 30-40 minutes.
- While the oven is heating, flour a flat surface and your hands and then remove the dough from the bowl. Fold the dough over itself 4 times.
- Use your hands to form into a tight ball. Place a piece of parchment paper into your bowl and then gently drop in the dough ball. Cover with a kitchen towel and allow to rest for 20 minutes
- Once your dutch oven is screaming hot, carefully remove from the oven, remove the lid and drop the parchment paper and dough ball into the dutch oven.
- Using a sharpe knife, slice the top of the dough to allow steam to release. Place cover back onto dutch oven and bake for 30 minutes
- After 30 minutes of baking, remove top of the dutch oven and allow bread to bake for an additional 15 minutes or until the loaf is a beautiful golden brown.
- Remove from oven, allow to cool for 10 minutes, then slice and enjoy!!! Well done, Chef!!
- Don’t forget to rate this recipe and leave a comment!
Why No Knead Bread Just Works
The beauty of no knead cinnamon raisin bread is exactly what the name says — no kneading required. Traditional bread methods rely on physical work to build gluten structure. This method lets time do the heavy lifting.
You combine your ingredients in a large bowl, cover it with plastic wrap, and let it sit on the counter. During the rise time, the active dry yeast slowly wakes up, creating air pockets and tiny bubbles throughout the dough. That slow fermentation builds incredible flavor and texture without you doing much at all.
It’s low effort, high reward — my favorite kind of baking.

Let’s Talk Ingredients In This No Knead Cinnamon Raisin Bread
This no knead cinnamon raisin bread recipe keeps it simple.
We’re using all purpose flour which gives the loaf structure while still keeping it tender. If you want to experiment, you can swap in a portion of bread flour for a slightly chewier texture or a little whole wheat flour for a nuttier edge — just keep the ratios close so the structure stays intact.
Active dry yeast is key here. Double check it’s fresh. A small amount goes a long way in a no knead dough.
Salt balances everything. Skip it and your bread will taste flat.
Warm water (95–105°F) activates the yeast without killing it.
Then we bring in the magic: cinnamon, plump raisins, rich brown sugar, and a drizzle of maple syrup folded into the dough after the first rise. That sugar melts into the layers, creating little caramelized pockets inside the loaf.

The Process (It’s Easier Than You Think)
The first step in this no knead cinnamon raisin bread is mixing everything together in a large bowl using a wooden spoon or your hands. The dough mix will be sticky — that’s exactly what you want.
Cover it with plastic wrap and let it sit on the counter for 3–5 hours. You can even stretch that out if life gets busy. The dough should double in size and develop visible bubbles across the top.
While it rests, you’re not just waiting — you’re building flavor.
Once risen, transfer the dough onto a lightly floured surface or work surface. Sprinkle the brown sugar and maple syrup over it, then fold it over itself four times. No intense kneading, just simple folds.
Shape it into a tight loaf and place it onto a piece of parchment paper. This makes for an easy transfer into the oven later.

The Dutch Oven Trick
If you want that crackly crust, a hot dutch oven is the move.
Preheat your dutch oven with the lid on inside a 450°F oven for 30–40 minutes. That blast of heat creates steam when the dough goes in, giving you that classic artisan crust.
Carefully drop the dough (with the parchment) into the pot. Use a razor blade or sharp knife to score the top — this helps control expansion and gives you that beautiful bakery-style finish.
Bake your no knead cinnamon raisin bread covered for 30 minutes, then remove the lid and bake another 15 minutes until the crust turns deep golden brown.
Let the bread cool before slicing. I know it’s hard, but cutting too soon releases steam and affects texture.

What If You Don’t Have a Dutch Oven?
No problem.
Place a pan of water in the bottom of your oven to create steam, and bake your bread in a cast iron pan or oven-safe dish. Remove the water after 30 minutes and finish baking uncovered. You’ll still get a gorgeous crust.
Serving Ideas For Your No Knead Cinnamon Raisin Bread
Once cooled, slice into thick slices and slather with butter. Toast it. Turn it into French toast. Eat it straight from the cutting board.
It makes an incredible snack, a cozy breakfast, or even a late-night treat.
Because it’s homemade, you control everything. No mystery ingredients. Just real flavor, a little cinnamon warmth, and chewy raisins in every bite.

Storage Tips
Store your loaf at room temperature for a couple days, loosely wrapped. For longer storage, keep it in the fridge or slice and freeze.
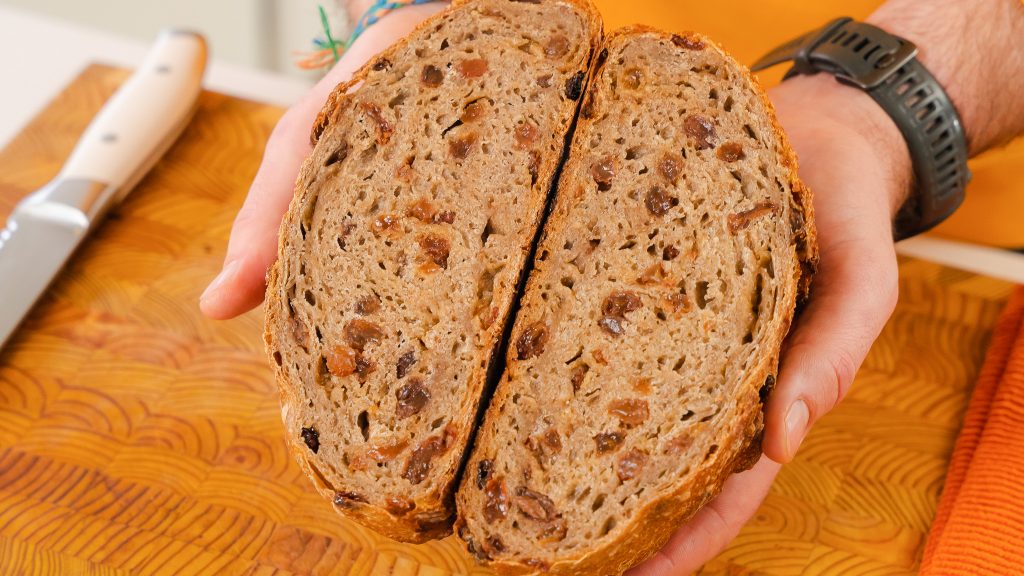
If you’re making it for social media — and you should — that cross-section shot is pure Instagram gold.
Final Thoughts On This No Knead Cinnamon Raisin Bread
If you’re a beginner, this is the bread to start with. It’s reliable, low effort, and wildly satisfying. You’ll feel like a pro pulling that golden loaf out of the oven.
This no knead cinnamon raisin bread deserves a permanent spot in your rotation of favorite recipes. Make it once, and I promise it becomes a staple.

Other Recipes You Will Love!
Andy Hay
Andy is the founder of ECK, Chef, and let’s admit it… the reason you’re here. He taught himself to cook, and it all paid off when he secured his spot in the season 5 Finale of Master Chef Canada. Now, Andy uses his big energy to showcase recipes that actually make people want to cook. His brand was built on butter and East Coast charm, and Andy’s kept that same energy ever since. Off-camera, you’ll find him doing what started it all: cooking for his two daughters, wife and the people he loves.
Similar recipes


Rate & leave a comment
74 Comments
— End of comments —
— No more comments to load —
My sister raved about this so I had to make it. She kneaded the sugar and maple syrup into the bread after letting it rise overnight. I tried to follow the directions about folding the dough and adding sugar and syrup to each fold. My dough was NOT a tight ball, and cinsequently, it was misshapen and some parchment paper stuck to teh bottom because the sugara and syrup oozed out. Do you recommend kneading it all in, or layering it while folding? It was still excellent but I want it took look prettier next time.
Thanks!
Hi Hope,
If the ball won’t hold its shape, here are two options:
– Option 1: Fold as directed, but reduce the syrup slightly (maybe 1 tbsp instead of 2). This helps keep the structure tighter.
– Option 2: Gently knead the sugar and syrup in all at once after the rise, then quickly shape into a ball. It won’t have quite the same swirl, but it’ll be neater and still taste amazing.
Also, letting the dough rest for 10 minutes before shaping can help it firm up just enough to handle better.
Either way, so glad it still tasted excellent!
My bread was burnt with 7 mins cook time remaining. 450 for 30min, then 15 with cover off seems high. Help, want to make it again.
Hi Janet, ovens can vary—a little less heat usually fixes this. Try baking at 425°F instead, and start checking a few minutes earlier once the lid is off.
Will be trying this recipe but what would be the maximum amount of time letting
the dough rise?
Terry
Great question, Terry! You can let the dough rise on the counter for up to 18 hours—any longer and it can start to over-proof.
I made this today. It did rise nicely. I boil A cup of water in the microwave and then put the bowl inside for 2 to 3 hours. Bake it in a Dutch oven. Afterwards, I let it cool down for over an hour so it was settled in. It was delicious. The used I use was active yeast in a little packet 2 1/4 teaspoons. It was delicious
That sounds perfect—love the microwave trick for creating a cozy proofing spot! And great to hear that the active dry yeast worked well. So glad it rose nicely and turned out delicious—thanks for sharing!
I’ve made this at least a dozen times and it’s always amazing! Very simple, very artisan, and everyone loves it. I’ve even got my brother baking it now.